
Microsoft Dynamics 365 Connector Start-up Guide
August 25, 2026
OVERVIEW
What this guide covers
This guide walks your CRM team through connecting Microsoft Dynamics 365 CRM to CaliberMind. Once connected, your Dynamics data flows into CaliberMind for attribution, funnel analysis, and pipeline reporting, giving your go-to-market teams a single, trusted view of what drives revenue.
The connection is powered by Fivetran, CaliberMind’s enterprise data integration partner. Setup takes a handful of steps and is typically completed in under 30 minutes.
What you’ll need
- A Microsoft Dynamics 365 account
- A Microsoft Entra ID (formerly Azure Active Directory) tenant
- Admin access to Azure and your Dynamics environment, required for the Service Principal method
The four steps
- Step 1: Find the connector in CaliberMind
- Step 2: Gather your Dynamics details
- Step 3: Authenticate (OAuth2 or Service Principal)
- Step 4: Finish configuration and test the connection
STEP 1
Find the connector in CaliberMind
Start inside your CaliberMind instance. This is where you will enter the Dynamics details you gather in the next steps.
- Log in to CaliberMind.
- Open Settings, then select Connectors.
- Choose Pull Connectors, since we are bringing Dynamics data into CaliberMind.
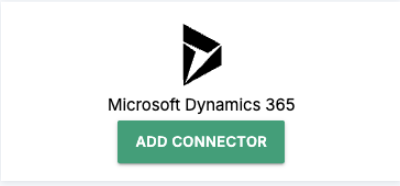
- Click Create, then select the Microsoft Dynamics 365 CRM connector to open the setup form.
STEP 2
Gather your Dynamics details
The connector needs two pieces of information from your environment: your primary domain name and your Dynamics resource URL. Collect both before returning to the CaliberMind form.
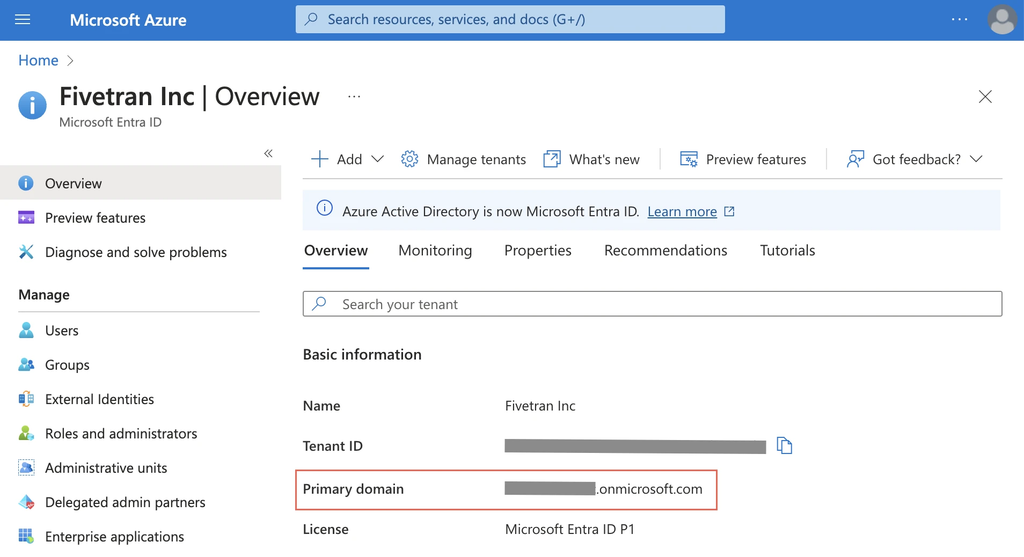
Find your primary domain name
- Log in to your Azure account at portal.azure.com.
- Select your account in the top-right corner, then choose Switch directory.
- On the Directory + subscription pane, choose the Microsoft Entra ID tenant that has a subscription to Dynamics 365.
- Open the Microsoft Entra ID section, then select Overview from the left-hand menu.
- Copy the primary domain name. You will paste this into CaliberMind later.
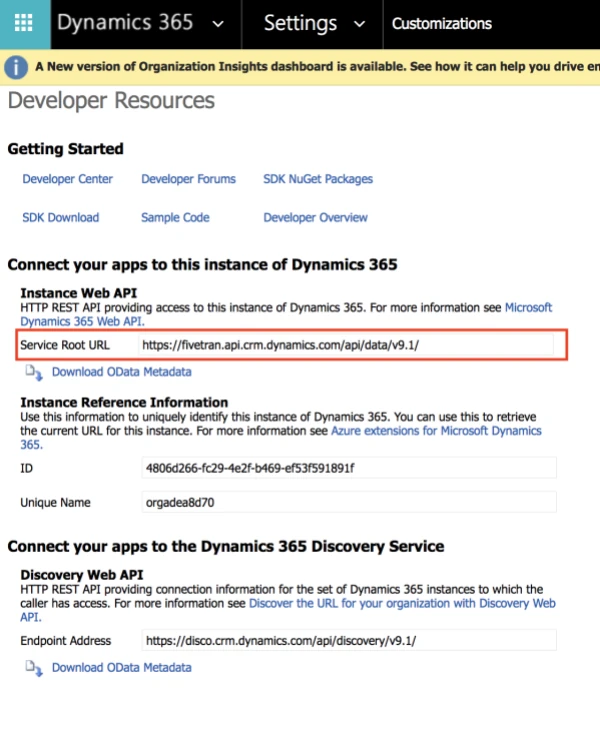
Find your resource URL
- Log in to your Dynamics 365 CRM instance.
- Click the settings icon, then select Advanced Settings.
- In the Settings drop-down, select Customizations, then Developer Resources.
- Copy the Service Root URL. This is your resource URL.
STEP 3
Authenticate
Choose one of two authentication methods. Both are secure and fully supported. Pick the one that fits how your team manages access.
Option A: OAuth2 (fastest)
OAuth2 is an interactive method. You simply sign in to your Dynamics account and approve access. There is nothing to configure ahead of time. If you choose OAuth2, you can skip straight to Step 4, where you will click Authorize and sign in.
- Best for a quick evaluation or a fast initial connection
- No app registration or secrets to manage
Option B: Service Principal (enterprise)
Service Principal is a non-interactive method that uses a dedicated application identity rather than a person’s login. It takes a few more steps up front but is the preferred approach for production and for teams that want access decoupled from any individual user. Complete the four sub-steps below, then continue to Step 4.
B1. Register an application
- In the Azure portal, open Microsoft Entra ID.
- Go to App registrations and click New registration.
- Enter a name for the application.
- For supported account types, select Accounts in this organizational directory only, then click Register.
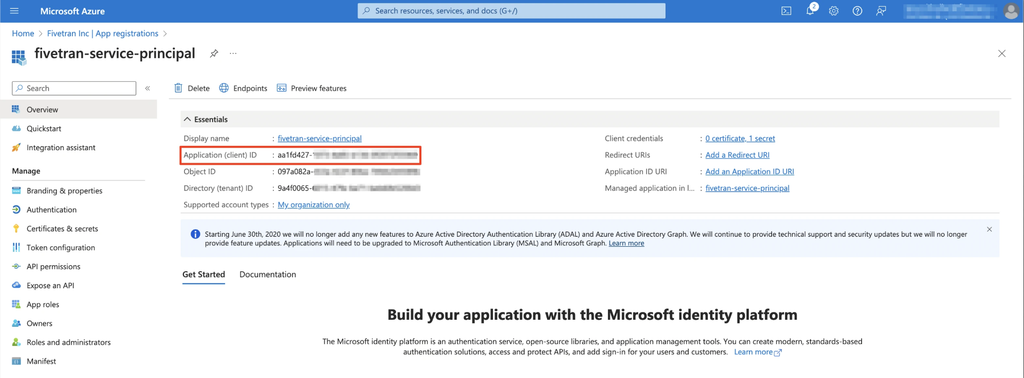
- Copy the Application (client) ID. You will need it in Step 4.
B2. Add API permissions
- Open the application you just registered.
- Select API Permissions, then click Add a permission.
- Choose Dynamics CRM.
- Select the user_impersonation checkbox and click Add permissions.
B3. Create a client secret
- Open the application you registered.
- Select Certificates & secrets, then click New client secret.
- Enter a description and choose an expiry period.
- Click Add, then copy the Value. You will need it in Step 4.
Tip: set a calendar reminder to rotate this secret before it expires. An expired secret will interrupt data syncs.
B4. Add the app as an application user
- Log in to the Power Platform admin center at admin.powerplatform.microsoft.com.
- Open Environments, select your Dynamics environment, then open Settings.
- Under Users + permissions, open Application users, then click New app user and Add an app.
- Search for the app you registered, select it, and click Add.
- Choose the Business unit that matches your Dynamics instance.
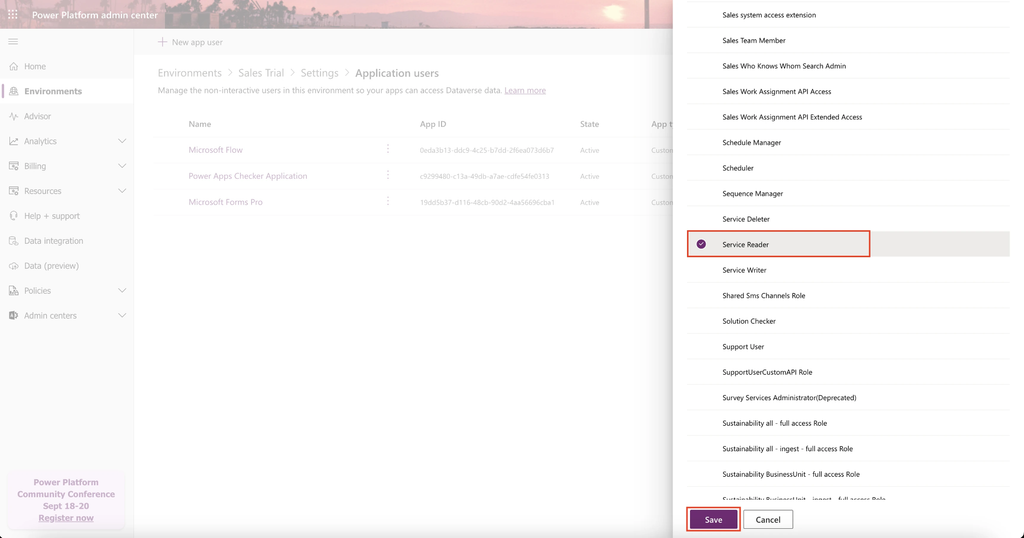
- Under Security roles, assign Service Reader (or any role with appropriate read permissions), then click Create.
STEP 4
Finish configuration and test
Return to the Microsoft Dynamics 365 CRM connector form in CaliberMind and complete the fields using the details you gathered.
- Enter a Destination schema name.
- Choose a naming convention. Fivetran naming standardizes table and column names for you; Source naming keeps the original Dynamics names. When in doubt, Fivetran naming is the safe default.
- Enter the primary domain name from Step 2.
- Enter the resource URL from Step 2.
- Select your auth type:
- OAuth2: click Authorize and sign in. Tip: use an incognito window to be sure you authorize the correct account.
- Service Principal: enter the Application (client) ID and the client secret Value from Step 3.
- Click Save & Test.
Once the test passes, the initial sync begins and your Dynamics 365 data starts flowing into CaliberMind. From here, your CaliberMind team helps you map the data into attribution, funnels, and reporting.
For the most current, step-by-step setup instructions, see the Fivetran setup guide
Questions about your setup? Contact your CaliberMind representative and we’ll walk through it with you.
